
I posted a page at Designer Digitals yesterday (click the photo to view in the gallery there).
It's a page for a scraplift challenge - with wonderful inspiration:

Step 1 Open a new canvas
Create a new 3600 x 3600 page (actually, mine is not square, but it doesn’t matter).Step 2 Add your map image
Open a map of the country you visited. I used Map overlays no1 by Katie Pertiet.Paste it onto your new page.
BTW, this could be ANY image from which you want to select a shape to use as a mask.
Step 3 Select the countries from your map
Use the Quick Selection Tool to select the countries you are after.Note: If your map was an overlay (like mine) you will need to turn on sample all layers so you can grab the white background for the countries.

It does get a bit fiddly. You will need to switch between the Add to selection and Subtract from selection buttons to refine your selection – remove country names, etc.

Step 4 Create an Extracted Mask Layer of your country
There are a couple of options you can use now. But one way is copy your selection using Edit -> Copy Merged (Shit + Ctrl + C) and paste as a new layer.Now press Ctrl + D to clear your selection.
Hide your map overlay layer.

Step 5 Clip a background image to your Extracted Mask Layer
You can choose any background you like. It just serves to fill in any gaps that the photos don't cover. I placed a Roughed Up Photo Mats Map over my mask layer.

Step 6
I added a shadow to my Extracted Map mask and dragged the two layers to make the map larger on my page.
Step 7 Add background photos
Then, starting at the top I added my background photos, clipping them to the Extracted Map mask in the same way I clipped the map in the step above.. I erased some of the edges of the photos to blend them into the map. (I actually used a layer mask to hide the edges rather than using the actual eraser.)
Step 9 Adding foreground photos
On top of those background images I placed a few extracted images. I did the extraction using the same way as I extracted the map mask. Mostly I just deleted the sky which is an easy one to select with the Quick Selection Tool and then press delete. Then I moved each one onto my page and placed it in position. Here they are all removed from the mask so you can see what I used. I have added a little shadow to each one already.
Step 10 Finishing Touches
Then I added the frame and text. (Actually I did them first because it gave me a sense of the overall design early on, but I forgot to show you that here!). And here it is again, the finished album cover!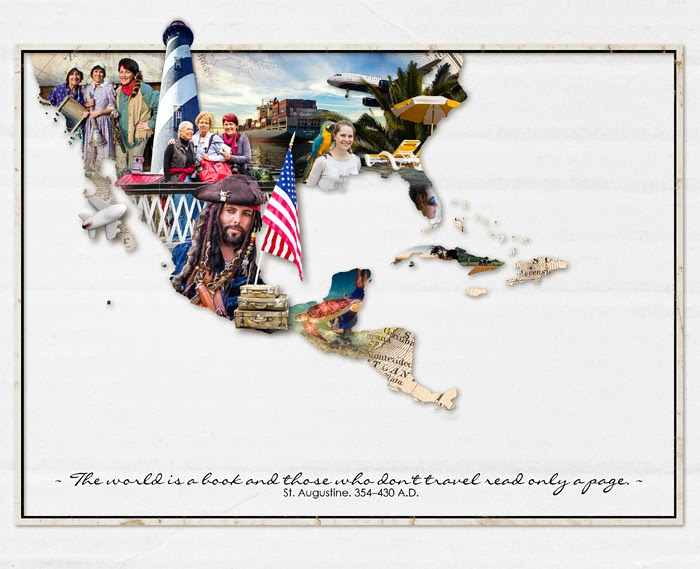
And maybe it does look complicated, but honestly I took longer selecting the photos than I did creating the page!
Credits
- Fifty States Brushes and Stamps MegaPak Map Overlays No. 01
- Rimmed Framers No. 02
- Roughed Up Photo Mats: Maps No. 02
- Almost There Solids Paper Pack
- Curated Studio Mix Scrapbooking Kit No. 01 (plane and suit cases)
- Finley Element Pack (also has the suitcases)
- Going Away Element Pack (also has the plane) Drop Shadow Styles Collection
So if you do a page like this and you don't post it in the Designer Digitals gallery, please post a comment with a link to your page!